How To Stage Food For Photography: Tips & Tricks
The Roman writer Apicius said that ‘we taste first with our eyes’; anyone who has got lost in a food blog when searching for recipes or scrolled through the #foodporn on Instagram will be well aware of the visual appeal of gorgeously styled food!
When done right, an image of a mouth-watering plate of food will capture the attention more than words ever could. It’s a scientific fact that just looking at photos of appetising food can actually cause us to salivate!
Every food brand needs to have beautiful photography across their packaging, website, social media and advertising, to stand out from the competition. Yet staging and shooting food to look as good as it tastes is no easy feat.
In this blog, we’ll share some tips and tricks to help you create photographs of food that are good enough to eat!
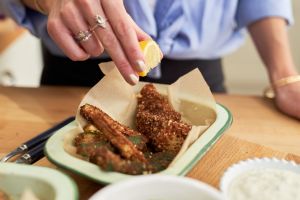
1. Plan and prep
When you’re working with food, it’s so important that it looks as fresh and tasty as possible. Some fresh foods can wilt and discolour, while cooked foods can dry up and look less appetising after a short while. But don’t be afraid to show certain foods in their natural form; even the big supermarkets are starting to embrace fruit and veg that are less than perfect.
Professional food photographers will always create a ‘shot list’ so they can plan out the best schedule and have everything ready. Having your food prepped and props ready will help minimise the time your food is sitting out, and it’s advisable to have some extra oils and glazes or a water spray bottle to freshen things up.
2. Tell a story
When planning the details of your shoot, think carefully about the story you want to tell. Do you want to showcase the food on its own? Or do you want to create a scene with a set dinner table and have people in the shot? Do you want the look to be bright and crisp or dark and seductive? Even a carefully placed piece of cutlery can help create a mood.
Pull together inspiration from websites or magazines to keep you focussed on the style you want to achieve.
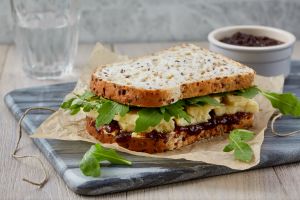
3. Style carefully
Choose your props with care and make sure they feed into the story you want to create. A block of parmesan and a cheese grater beside a plate of pasta is warm and inviting, while a spoon beside a chocolate pudding will grab most people’s attention!
Be careful to maintain a cohesive style across all your imagery. For example, don’t mix rustic earthenware with delicate vintage plates.
And before you take your shot, don’t forget to add some finishing touches. Garnish with herbs, drizzle with oil or add some strategically placed drips for added appeal.
4. Let the food speak for itself
Whether you’re going for a minimalist stye or something more lavish, the food should always be the hero of the shoot. It’s a common mistake to distract the viewer with too many props or colours in the frame. This is one of the reasons that restaurants tend to serve food on white plates.
Don’t have anything in the shot that competes with the food!
5. Use natural daylight
You don’t need expensive equipment like spotlights to take beautiful images. Natural daylight is free, and it’s the best choice for food photography. Of course, the British weather sometimes makes it impossible to find a location that is bright enough and, in this case, a good source of artificial light can be really helpful.
Try to avoid photographing in harsh sunlight; early morning and before sunset are the times with the best light.
6. Play with composition and angles
Stylised, gorgeously presented food needs to be carefully arranged. The rule of thirds is a simple trick to help you get the right balance in your photographs. Imagine that the entire image is divided into a 3×3 grid, then place your objects at any of the four intersecting points.
Try photographing the same image from lots of different angles, including from directly above. And once you’ve got the shots you like, try cropping them in different ways to draw the viewer’s eye to different parts of the image.
7. Learn about scale, focus and white balance
While good styling and lighting are the fundamentals of good food photography, learning a little bit about the technical side of photography will take your images to the next level.
Simply adjusting the focus on your camera can create different moods. A shallow depth of field blurs the background, focusing in on the details you want to highlight to add drama or a dreamy feel. A deeper depth of field brings everything into focus and is great for showing off wider scenes.
If you’re using an SLR camera, different lenses can really transform the images you take. Macro lenses are popular in food photography as the longer focal length makes the subject ‘pop’ and you get a beautiful, close-up image that is so flattering for some foods.
Finally, understanding the effect of white balance on your images will allow you to take images that are brighter, clearer and more professional.
With these simple tips, you can really improve the images you take.
If you need any more expertise in creating eye-catching foodie scenes or images to make your mouth water, get in touch!